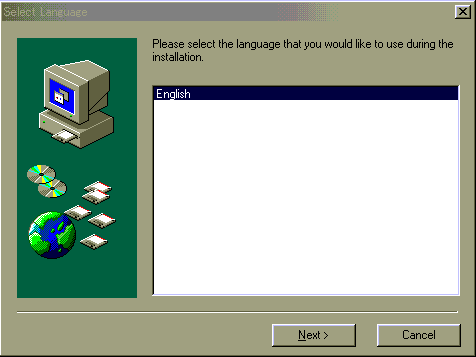
Here you can get information on the SEAL system, get the SEAL Manual in a PDF file, and download the system.
May 13, 2002 Seal 6.1E published: New SEAL installing file now available!
The new installing file made it possible to install the SEAL system and data files only with one action. See
below.May 5, 2002 "A Room for Linguistic Geography" now open!
The system has been revised as follows:
1983 The SEAL system programmed in BASIC was developed for NEC PC-8801 and the users' manual was published. Chitsuko Fukushima reported on the usefulness of a personal computer as a tool to analyze geolinguistic data.
1991 The SEAL system was revised so as to work on a new series of computers, NEC PC-9801. The users' manual version 2 was published.
April 1991-March 1995 The SEAL system was converted to the BASIC compiler version and published as version 4.3.; thus, the system worked on a MS-DOS computer and using text file data was made possible. The users' manual version 3 was published.
April 1995-March 1998 The SEAL system was reprogrammed in Visual BASIC as the system which worked on Windows 95 and published as version 5.0. The users' manual version 4 was published. The web page "A Room for Linguistic Geography" was opened as a site for announcements and downloading
(http://www.nicol.ac.jp/~fukusima/).
April 1998-March 2001 In the web page cited above, SEAL version 5.0 for Windows 95 was published for downloading. The system was revised several times later, and every version was announced and prepared for downloading: version 5.1, version 5.5, and version 6.0. The latest version SEAL also had an English version that works on English version Windows.
Figure 1: An example linguistic map from CLAE
This map was produced using the data of Computer Developed Linguistic Atlas of England (CLAE) 1 & 2, provided by Professor Dr. Wolfgang Viereck, University of Marlburg, Germany.
The original mono-chrome map was taken from C. Fukushima 1997b although the map shown here uses colorful symbols: M47 he has.
Viereck, Wofgang, in collabolation with Heinrich Ramische, The Computer Developed Linguistic Atlas of England 1. Max Niemeyer Verlag, Tuebingen. 1991.
Viereck, Wofgang and Heinrich Ramische, The Computer Developed Linguistic Atlas of England 2. Max Niemeyer Verlag, Tuebingen. 1997.
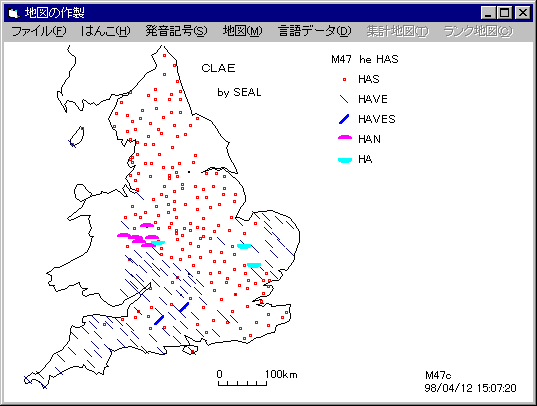
Figure 2: Diffusion Map 1 (from Linguistic Atlas of Southwestern Izumo)
Cumulative analysis of the old [au] sound 1 (Integration of lexical items)
In the north, the [a:] forms are used, and the [o:] forms in the south are advancing north.
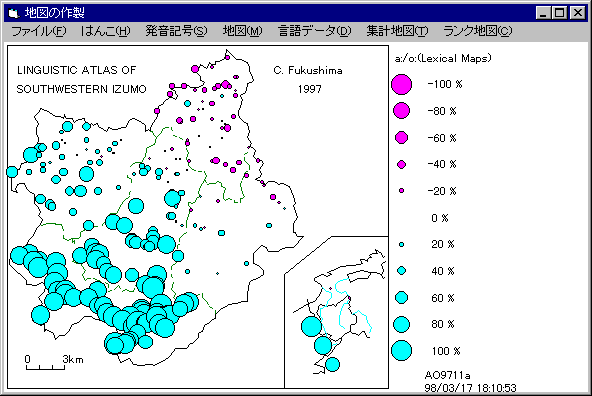
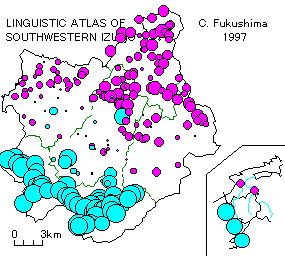
Figure 3: Diffusion Map 2 (from Linguistic Atlas of Southwestern Izumo)
Cumulative analysis of the old [au] sound 2 (Integration of grammatical items)
The differences of distribution in grammatical items are smaller. The border of two dialect areas is clearly depicted.
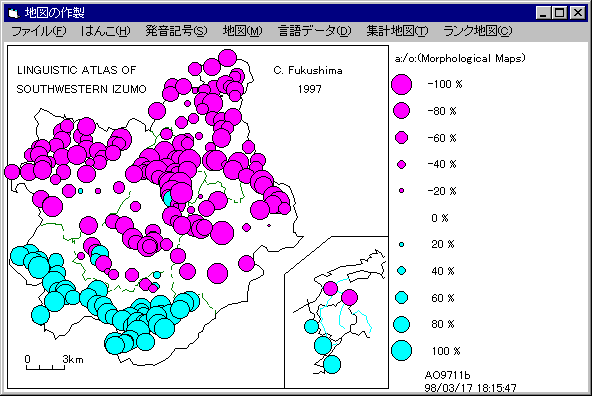
Figure 4: Contrast Map (from Linguistic Atlas of Southwestern Izumo)
Combination of cumulative analysis of the old [au] sound 1 and 2 (Integration of lexical and grammatical items)
There is an area in the middle between the northern and southern area.

The SEAL system is open to the public for academic use through our Web page (http://www.nicol.ac.jp/~fukusima/english/). You can download SEAL from this site. The system includes the sample map and data files. The SEAL system works on the DOS/V personal computer with the OS of Windows 95/98/Me/2000/Xp. For English version Windows,
SEAL version 6.2E and 6.3E are available.
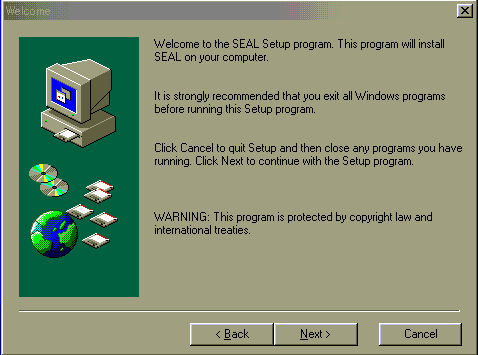
We have developed the SEAL system for academic purposes. We will not be responsible for any damage installing SEAL might cause. In case you cannot properly install SEAL, please refer to SEAL trouble shooting or contact us. We will try to respond to your questions and/or request promptly as long as the language is English or Japanese.
The system may have bugs. When you find any bugs, please inform us.
You are free to publish the maps produced by SEAL. However, please state clearly in your publication that you used the SEAL system developed by Chitsuko and Yusuke Fukushima. We would appreciate it if you would send us your publication.
<SEAL 6.1E is older now. You are advised to install
SEAL 6.2E or 6.3E. These are the same except the list of phonetic alphabet
available.>
You can download the system and data files of the SEAL 6.2E and 6.3E systems here. You can use Internet Explorer or Nescape to download.
If you cannot use the Internet, it is possible to send the the installing file on CD-R by postal mail. Refer to the end of this research report for contact information.
There are two steps in the SEAL installation process.
-
Download the installing file from this site.
Please read and follow the instructions below to download and install the SEAL system to the hard disk on your computer.
You can also download the "readme.doc" file or the "readme.txt" file in which important sections in this web page are copied: Downloading and Installing SEAL
6.1, Starting SEAL 6.1, Trouble Shooting etc.
(The new info for Windows 6.2E and 6.3E is not included.)
Click here and save the file in your hard disk: readme.doc
Right-click here and save the file in your hard disk: readme.txt
-
Download the installing file from this site.
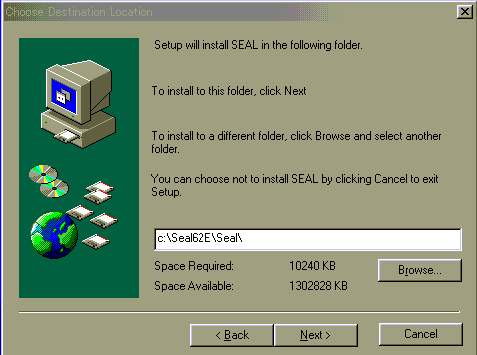
Download either of the installing file to any folder on your hard disk. The size of
these files is 3374KB or 3599KB. You cannot download it on floppy disks.
Click here and download the installing
file for SEAL 6.3E : Seal63ESetup.exe

All information necessary to install the program is listed. Click [Next] to continue. If you want to correct the information, click [Back] to reinput the information.

Then the installation will start. The files will be copied to the hard disk.

When the windows displays "Setup Complete", click [Finish].
Finally, the ad message on the installer software used to make this installing file will be displayed. Click [OK].
The SEAL setup is now complete. The data files have also been installed. You can start the SEAL program now.
The SEAL folder structure is shown below: either c:\Seal62E\
or c:\Seal63E\ has the Seal\ folder, which has three folders and
two files. In the Pro\ folder, many system files including Seal.exe and other DLL files are stored. The SealData\ folder and SealSymbol\ folder are the data folders.
SEAL 6.2 E
| c:\Seal62E\ | - | Seal\ | - | SealData\ | | |
| | | | - | SealSymbol\ | |
| | | | - | Pro\ | | |
| | | | - | Setup.log | | |
| | | | - | Uninstall.exe | | |
SEAL 6.3 E
| c:\Seal63E\ | - | Seal\ | - | SealData\ | | |
| | | | - | SealSymbol\ | |
| | | | - | Pro\ | | |
| | | | - | Setup.log | | |
| | | | - | Uninstall.exe | | |
(1) To start the SEAL 6.2E or 6.3E, locate the SEAL 6.2E
or 6.3E shortcut
on the desktop and double-click it. You can also start the SEAL system by double clicking the
"Seal.EXE" file
in the C:\Seal62E\Seal\ folder or in
the C:\Seal63E\Seal\ folder using Explorer.
(2) When you start the SEAL system for the first time, you have to input some information
following the instructions below. You don't need to repeat this after the first run of the program usually.
(This process is simpler than the previous versions: you don't need to input
the name of the folder where the SEAL folder is located.)
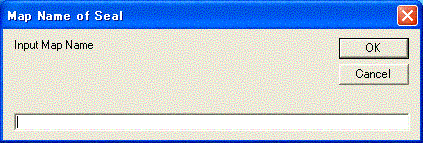
First, the following message will be displayed. Enter either "sample" or "sample60" as a map name, in which the data for demonstration are stored, and click the [OK] button.
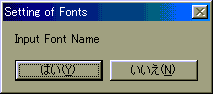
Next, you have to set the font information. Click [Yes(Y)] to continue. On your display only English message will be displayed unlike the figure below.
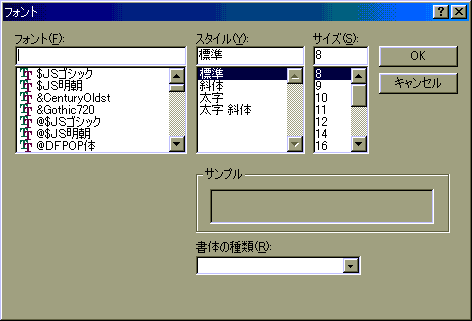
Then, specify the font data, i.e., "Font", "Font style" and "Size". The choices for the font style are "Regular(Standard)", "Italic", "Bold", and "Bold Italic". Thus, click and select "Arial", "Regular", and "10", for example. Then click the [OK] button. On your display only English message will be displayed unlike the figure below.
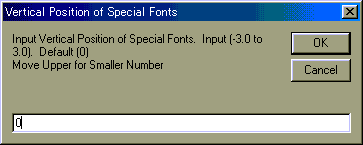
Finally, you have to input the vertical position of special fonts. Enter "0.0" or "0" and click the [OK] button. In the SEAL system, we can use a special set of fonts. However, these fonts sometimes may not be plotted in the same vertical position. Therefore, we adjust the position using the value of "Vertical Position of Special Fonts". We can use a decimal number as the value of vertical position.
As explained before, the procedure described above is necessary when the SEAL system is started for the first time. The information entered is stored in the "SealDrive Name.map". If you think it necessary to change the information or fail to enter the proper information, the "SealDriveName.map" file must be deleted
manually and you have to enter the new information.
(3) After the data input above, the SEAL Main form will appear. In this form, you can jump to other forms where you can input the data,
analyze the data, specify the symbols to the forms, draw linguistic maps, and synthesize the data of different maps. You can also end the SEAL system in this form.
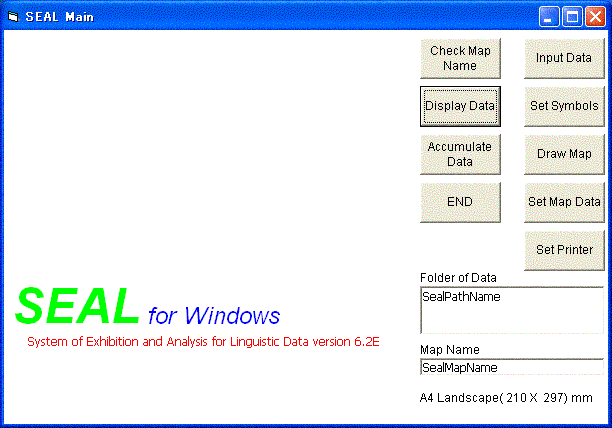
You should download the PDF Users' Manual in the next section in order to consult how to use the SEAL system.
(4) Once the data is entered, it is not necessary to repeat it usually. From the second starting, SEAL will return the following message and ask if we want to confirm the data or not.
Drive Name, Map Name, Font
Drive Name c:\Seal62E\
or Drive Name c:\Seal63E\
Map Name sample
Font Arial
Font Style 'Standard'
Size of Fonts 10 OK?
Yes No
Here the font style "Regular" is printed as "Standard" on the screen. If you want to keep the data, click the [Yes] button. If you want to change it, click the [No] button. In this way, you can change the font data or even the kind of map data at each run of the SEAL system.
The sets of special fonts, which include either phonetic alphabet or Spanish alphabet, are stored in the following folders:
\SealSymbol\Standard16
\SealSymbol\Bold16
\SealSymbol\Standard18
\SealSymbol\Bold18
Fonts have two styles; one is "Regular" (printed as "Standard" in the system) and another is "Bold". The font sizes are 16 dots and 18 dots. A list of these special fonts is shown when you choose one of the menus, [Phonetic Alphabet (P)], in the 'Draw Maps' form.
When SEAL 6.2E or 6.3E is started, you are in the non-printing mode. If you want to print a map or any page,
you have to set a printer.
Suppose you are on the "Draw Map" form, you are ready to print
a linguistic map. Drag the [file] menu and choose [print
Y/N]. The following message will appear.

Click [OK]. Then drag the [file] menu and choose [To Main].
On the
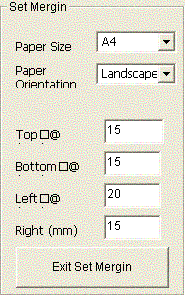
"Seal Main" form, click the [Set Printer] button. The "Set
Margin" frame will appear. Here you can change the paper size, paper
orientation, and margins. Change if necessary, and click the [Exit Set
Margin] button.
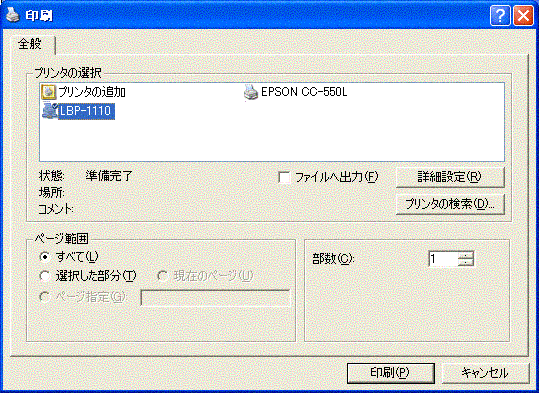
Next, the "Printing" form will appear. Here you can choose a
printer. After choosing a printer and click the [Print] button.
Now you are back to the Main form. Click the [Draw Map] button and go
back to the "Draw Map" form. Drag the [File] menu and choose the
[Print Y/N] menu. The message box will ask you, "Will you print?"
Click the [Yes] button. Click the [Linguistic Map] menu and the linguistic
map will be printed.
<SEAL 6.1E is older now. You are advised to install
SEAL 6.2E.>
You can download the system and data files of the SEAL 6.1E system here. You can use Internet Explorer or Nescape to download.
If you cannot use the Internet, it is possible to send the the installing file on CD-R by postal mail. Refer to the end of this research report for contact information.
There are two steps in the SEAL installation process.
-
Download the installing file from this site.
Please read and follow the instructions below to download and install the SEAL system to the hard disk on your computer.
You can also download the "readme.doc" file or the "readme.txt" file in which important sections in this web page are copied: Downloading and Installing SEAL, Starting SEAL, Trouble Shooting etc.
Click here and save the file in your hard disk: readme.doc
Right-click here and save the file in your hard disk: readme.txt
Download the installing file from this site.
Download the file to any folder on your hard disk. The size of this file is 3312KB. You cannot download it on floppy disks.
All information necessary to install the program is listed. Click [Next] to continue. If you want to correct the information, click [Back] to reinput the information.

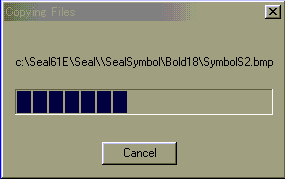
Then the installation will start. The files will be copied to the hard disk.
When the windows displays "Setup Complete", click [Finish].
Finally, the ad message on the installer software used to make this installing file will be displayed. Click [OK].
The SEAL setup is now complete. The data files have also been installed. You can start the SEAL program now.
The SEAL folder structure is shown below. c:\Seal61E\ has the Seal\ folder, which has three folders and one file. In the Pro\ folder, many system files including Seal.exe and other DLL files are stored. The SealData\ folder and SealSymbol\ folder are the data folders.
| c:\Seal61E\ | - | Seal\ | - | SealData\ | | |
| | | | - | SealSymbol\ | |
| | | | - | Pro\ | | |
| | | | - | Setup.log | | |
(1) To start the SEAL 6.1E, drag the [Start] button, the [Programs (P)] button, the [Seal 6.1 E] group, and finally click the [Seal 6.1 E] icon. You can also start the SEAL system by double clicking the "Seal.EXE" file using Explorer. Or make the short cut of Seal.exe on your desk top to start.
(2) When you start the SEAL system for the first time, you have to input some information follwing the instructions below. You don't need to repeat this after the first run of the program usually.
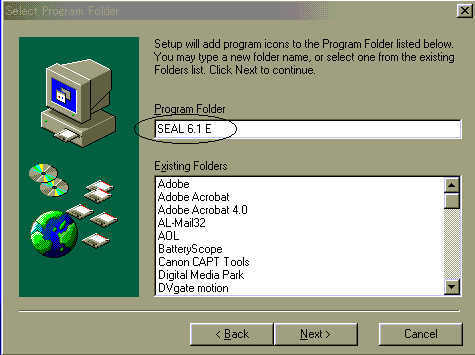
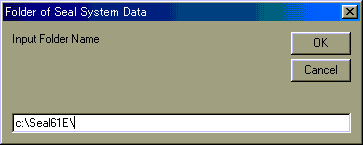
First, the following message will be displayed. Input the folder name in which the "Seal" folder is located: \Seal is in the c:\Seal61E\ folder, so input "c:\Seal61E\". This "\" must be entered to avoid an error message. Then click the [OK] button.
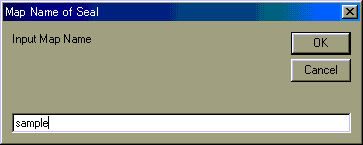
Next, the following message will be displayed. Enter either "sample" or "sample60" as a map name, in which the data for demonstration are stored, and click the [OK] button.
Next, you have to set the font information. Click [Yes(Y)] to continue. On your display only English message will be displayed unlike the figure below.
Then, specify the font data, i.e., "Font", "Font style" and "Size". The choices for the font style are "Regular(Standard)", "Italic", "Bold", and "Bold Italic". Thus, click and select "Arial", "Regular", and "10", for example. Then click the [OK] button. On your display only English message will be displayed unlike the figure below.
Finally, you have to input the vertical position of special fonts. Enter "0.0" or "0" and click the [OK] button. In the SEAL system, we can use a special set of fonts. However, these fonts sometimes may not be plotted in the same vertical position. Therefore, we adjust the position using the value of "Vertical Position of Special Fonts". We can use a decimal number as the value of vertical position.
As explained before, the procedure described above is necessary when the SEAL system is started for the first time. The information entered is stored in the "SealDrive Name.map". If you think it necessary to change the information or fail to enter the proper information, the "SealDriveName.map" file must be deleted and you have to enter the new information.
(3) After the data input above, the SEAL Main form will appear. In this form, you can jump to other forms where you can input the data, analyse the data, specify the symbols to the forms, draw linguistic maps, and synthesize the data of different maps. You can also end the SEAL system in this form. You should download the PDF Users' Manual in the next section in order to consult how to use the SEAL system.
(4) Once the data is entered, it is not necessary to repeat it usually. From the second starting, SEAL will return the following message and ask if we want to confirm the data or not.
Drive Name, Map Name, Font
Drive Name c:\Seal60E\
Map Name sample
Font Arial
Font Style 'Standard'
Size of Fonts 10 OK?
Yes No
Here the font style "Regular" is printed as "Standard" on the screen. If you want to keep the data, click the [Yes] button. If you want to change it, click the [No] button. In this way, you can change the font data or even the kind of map data at each run of the SEAL system.
The sets of special fonts, which include either phonetic alphabet or Spanish alphabet, are stored in the following folders:
\SealSymbol\Standard16
\SealSymbol\Bold16
\SealSymbol\Standard18
\SealSymbol\Bold18
Fonts have two styles; one is "Regular" (printed as "Standard" in the system) and another is "Bold". The font sizes are 16 dots and 18 dots. A list of these special fonts is shown when you choose one of the menus, [Phonetic Alphabet (P)], in the 'Draw Maps' form.
Trouble Shooting: Installing the SEAL system
It has been confirmed that the SEAL system works on various versions of Windows. However, one of Visual Basic 6.0 runtime files is missing in the Windows folder of newer versions of Windows such as Vista, 7 or 8. Thus you need to install the missing file before you install the SEAL system to a Windows machine. The name of the file to be installed is
COMDLG32.OCX. You are adivised to find a program with which you can install the missing Visual Basic 6.0 runtime file by googling with keywords sych as "Visual Basic 6.0 runtime files COMDLG32.OCX".
(1) Deletion of "SealDriveName.map"
When you have any trouble in starting the system, you should locate and delete the "SealDriveName.map" file. In the original installation, the file will be found in the
c:\Seal62E\ folder. Using Explorer, search the "SealDriveName.map" file and delete all of them found in "My Computer".
(2) Location of SEAL Data Folders
The data folders, the SealData\ folder and the SealSymbol\ folder, must be put in the Seal\ folder, but this Seal\folder can be located anywhere, for example, at the root of the C Drive: c:\seal\. If you move the data folder or make the new folder, check if the data folders are properly set.
(3) Uninstall the SEAL system
There uninstallation processs differs depending on the version of the SEAL. If you are using SEAL
6.1E or 6.2E, just delete the c:\Seal61E\ or c:\Seal62E\ folder. That is all you have to do. If you are using the SEAL 6.0E, which was available only for a short time, never delete the Seal60E\ folder using Explorer. You are advised to use the Add/Remove Programs in the [Control Panel]. Drag the [start] button, [Setting], [Control Panel], and [Add/Remove Programs]. Then, you should execute the "Uninstall.exe" file in the Seal\ folder to remove all the files involved.
NEW INFO: You can download the users' manual of SEAL 6.2E/6.3E system (English version, Adobe PDF file, 715KB) here. This manual has
been remade so that it includes the up-to-date information on 6.2E/6.3E. You need Acrobat Reader to read and print the file. You can download the Acrobat Reader for free from its corporate Web site. If you have installed ADOBE Acrobat Reader, left-click here and read/print the file. You can download the users' manual even if you haven't installed Acrobat Reader:
*Here only the publications written in English are listed.
SEAL User's Manual
- Chitsuko & Yusuke Fukushima,SEAL Users' Manual, Sixth Edition (English Version): SEAL Version 6.0E for English Version Windows 98/Me/2000 Research Report for Grant-in-Aid for Scientific Research (C)(2) 2001-2003 2002/March
(The copy can be downloaded here as a PDF file.)
Academic Papers
- Fukushima, Chitsuko, 'Standardization in England Based on the Morphological
Data of CLAE.' The Computer Developed Linguistic Atlas of England 2. Max Niemeyer Verlag, Tuebingen. pp.51-56. 1997/ Aug.
- Inoue, Fumio and Fukushima, Chitsuko, 'A Quantitative Approach to English Dialect Distribution: Analyses of CLAE Morphological Data.' The Computer Developed Linguistic Atlas of England 2. Max Niemeyer Verlag, Tuebingen. pp. 57-65. 1997/ Aug.
- Fukushima, Chitsuko, 'Calculating and mapping regional speech variation
in Tokunoshima' The Bulletin of Niigata Women’s College 37 pp.79-87 2000/March
- Fukushima, Chitsuko, 'Using a personal computer to grasp dialectal variation'
Dialectologia et Geolinguistica 8 pp.37-52. 2000/Aug.
- Fukushima, Chitsuko, 'Linguistic innovation born in the paradigm: Interpretation
of linguistic maps.' In Proceedings of 3rd International Congress of Dialectologists and Geolinguists,
Lublin 2000. Maria Curie-Sklodowska University Press: Lublin. Vol.1 pp.194-207. 2003/July.
- Motoei Sawaki, Chitsuko Fukushima, and Yumi Nakajima, 'Dialect Corpus as
a Resource for Dialect Dictionary.' In: Proceedings of 4th International Congress of Dialectologists and Geolinguists,
Riga 2003. 2006.
- Chitsuko Fukushima, 'Changing Dialects of the Young Generation in Niigata, Japan, with the Focus on Adjectives' In: Guido Oebel (ed.), Japanische Beitrage zu Kultur und Sprache: Studia Iaponica Wolfgango Viereck emerito oblata. Lincom GmbH: Munich.. 2006.
- Chitsuko Fukushima, 'Superimposing Linguistic Maps to Trace Linguistic
Changes.' Linguistica Atlantica 27-28, pp.40-45. 2007.
- Chitsuko Fukushima and David Heap,'A Report on an International Conference:
Geolinguistics around the World.' Dialectologia 1, pp.135-156. http://www.publicacions.ub.es/revistes/dialectologia1/
- Chitsuko Fukushima, 'Comparing Linguistic Maps from Different Surveys' Web Journal Dialectologia 4. 13-22. 2010.
- Chitsuko Fukushima, 'Integrating Linguistic Maps to Show Scholarly Interpretation'
Web Journal Dialectologia Special issue I (2010) 47-61. 2010.
- Motoei Sawaki, Yumi Nakajima, and Chitsuko Fukushima, “Standardization
and Dialect Leveling in Tokunoshima” Working Papers from NWAV Asia-Pacific 2. 2013.
- Chitsuko Fukushima. Revisiting regional variation on an island after thirty years. In: Proceedings of Methods XIV: Papers from the Fourteenth International Conference on Methods in Dialectology, 2011. Peter Lang. 305-314. 2013.
- Chitsuko Fukushima. Tracing real and apparent time language changes by
comparing linguistic maps. In: The future of dialects: Selected papers from Methods in Dialectology XV. (Edited by Marie-Hélène Côté, Remco Knooihuizen and John Nerbonne) Language
Science Press. 363–376. 2016.
- Chitsuko Fukushima. Sun in Asia. Studies in Asian Geolinguitics II, 1-2. 2016. https://publication.aa-ken.jp/
- Chitsuko Fukushima. Reorganization of Verbal Conjugation System in Japanese Dialects: a Case Study in Tokunoshima Dialect. In: VII. Congress of International Society for Dialectology and Geolinguistics: Selected Papers, 9-18. 2017.
- Chitsuko Fukushima. Dialect Dictionaries in Japan: Comparison with Alcover’s
Dictionary (DCVB). Dialectologia Special Issue VII (2017), 73-81. 2017. http://www.publicacions.ub.edu/revistes/dialectologia/
- Chitsuko Fukushima. Reconsidering the Change of Verbal Conjugation Systems
in Tokunoshima Dialects: The Prohibitive Form as Another Proof. Acta Linguistica Lithuania 79, 55-65. 2019. http://lki.lt/leidiniai/periodiniai-leidiniai/acta-linguistica-lithuanica/?lang=en
- Chitsuko Fukushima. Variation and Change of Adjectives in Niigata Dialects. Proceedings of International Conference in Asian Geolinguistics 4. 2019. https://publication.aa-ken.jp/
- Chitsuko Fukushima. Interplay of Phonological, Morphological, and Lexical
Variation: Adjectives in Japanese Dialects. Languages 2019, 4(2), 31. 2019. https://doi.org/10.3390/languages4020031
Academic Presentations
- Fukushima, Chitsuko, 'Using a personal computer to grasp dialectal variation.' A paper presented at 2nd International Congress of Dialectologists and Geolinguists in Amsterdam, July 29, 1997.
- Fukushima, Chitsuko, 'Calculating and mapping regional variation on an island.' A paper presented at Tenth International Congress on Methods in Dialectology (Methods X), St. John's, NF, Canada. August 2,1999.
- Fukushima, Chitsuko, 'Linguistic Innovation born in the paradigm: Interpretation of linguistic maps.' A paper presented at 3rd International Congress of Dialectologists and Geolinguists, Lublin, Poland. July 25, 2000.
- Fukushima, Chitsuko, 'Interplay of Geographical and Generational Variation in Local Japanese Dialects' A paper presented at Eleventh International Congress on Methods in Dialectology (Methods XI), Joensuu, Finland. August 6, 2002.
- Sawaki, M., C. Fukushima, and Y. Nakajima. 'Dialect Corpus as a Resource for Dialect Dictionary.' A paper presented at 4th International Congress of Dialectologists and
Geolinguists, Riga, Latvia. August 1, 2003.
- Chitsuko Fukushima, 'Superimposing Linguistic Maps to Trace Linguistic Changes' A paper presented at 12th International Congress on Methods
in Dialectology (Methods XII) Moncton, New Brunswick, Canada. August, 2005.
- Motoei Sawaki, Yumi Nakajima, and Chitsuko Fukushima, 'Making Multimedia Dialect Dictionary as a Database with Indexes and Cross-references.' A paper presented at 5th International Congress of Dialectologists and Geolinguists
Minho, Portugal. September, 2006.
- Chitsuko Fukushima, Progress in geolinguistics: What has been made possible using a computer? A paper presented at 13th International Congress on Methods
in Dialectology (Methods XIII) Leeds, UK. August 4, 2008. PPT file (1849KB)
- Chitsuko Fukushima, Revisiting Regional Variation on an Island after Thirty Years. A paper presented at 14th International Congress on Methods in Dialectology (Methods XIV), University of West Ontario, London, Canada. 2011.
- Motoei Sawaki, Yumi Nakajima, and Chitsuko Fukushima. Standardization and Dialect Leveling in Tokunoshima. A paper presented at NWAV-AP2, NINJAL. 2012.
- Chitsuko Fukushima, Potential Forms in Niigata Dialect: A Preliminary Report' A paper presented at the First International Conference on Asian Geolinguistics, Aoyama Gakuin University. 2012.
- Chitsuko Fukushima, Inference Forms in Niigata Dialect: A Preliminary Report' A paper presented at the First Annual Meeting of the Asian Geolinguistics Society of Japan, Aoyama Gakuin University. 2013.
- Chitsuko Fukushima. Regional variation and change of quasi-nominal particles in Japanese dialects. A paper presented at the 2nd International Conference on Asian Geolinguistics (ICAG-2). Bangkok, Thailand. 2014.
- Chitsuko Fukushima. Tracing real and apparent time language changes: Linguistic maps and GIS. A paper presented at the 15th International Conference on methodology in dialectology (Methods in Dialectology XV) Groningen, Netherlands. 2014.
- Chitsuko Fukushima. Reorganization of verbal conjugation system in Japanese
dialects: a case study in Tokunoshima dialects. A paper presented at the
8th ICDG (SIDG '15), Northern Cyprus. 2015.
- Chitsuko Fukushima. Sun in Asia. A paper presented at the 2015 second meeting of ILCAA Joint Research Project 2015-2017 Studies in Asian Geolinguistics at Tokyo University of Foreign Studies. 2015.
- Chitsuko Fukushima. Geographical Distribution of Quasi-Nominal Particles in Japanese Dialects, ICAG-3. A paper presented at Royal University of Phnom Penh, Cambodia. May 24, 2016.
- Chitsuko Fukushima. Methods and principles of geolinguistics. A paper presented
at SEALS 27. Padan, Inonesia. May 11, 2017.
- Chitsuko Fukushima. Comparing integrated geographical distributions to
grasp language changes. A paper presented at Methods in Dialectology XVI.
NINJAL, Tokyo, Japan. August 7, 2017.
- Chitsuko Fukushima. Variation and Change of Adjectives in Niigata Dialects
A paper presented at the 4th International Conference on Asian Geolinguistics
Univeristy of Indonesia, Jakarta, Indonesia May 4, 2018.
- Chitsuko Fukushima. Reconsidearing the Change of Verbal Conjugation Systems
in Japanese Dialects: The Prohibitive Form as Another Evidence A paper
presented at SIDG 9 Vilnius, Lithuania. July 25, 2018.
- Chitsuko Fukushima. Towards Interlingual Dialectology: Takesi Sibata. A
paper presented at SIDG 9. Vilnius, Lithuania. July 27, 2018.
- Chitsuko Fukushima. Interplay of Phonological, Morphological, and Lexical Variation: Adjectives in Niigata dialects. Komatsu Round-Table Conference on Geo-linguistics. A paper presented at Komatsu University. September 8, 2018.
- Chitsuko Fukushima. Sun in Asia: Comparison with ALE. A paper presented
at the 1st Annual Conference of the Geolinguistic Society of Japan. Aoyama
Gakuin University. October 5, 2019.
Please request copies of papers if you are interested in the publication listed above.
Chitsuko Fukushima
University of Niigata Prefecture
471 Ebigase, Higashi-ku, Niigata City
950-8680 JAPAN
TEL: +81-(0)25-270-1300 Main
E-mail: "chitsuko" followed by "@unii.ac.jp"
Copyrights (c) 2002-2019 Chitsuko Fukushima, All Rights Reserved.
Top page of A Room for Linguistic Geography